fbpx

Simple Activity Based Costing

Simple activity based costing is used for a wide variety of projects. Everything from identifying waste in processes through to building business cases for change and transformation programmes.

You’ll find there are many different approaches available so you may be asking yourself which is best for you? In this article we explore the simplest form of activity based costing which will typically suit 80% of uses. Plus it will get you to an answer far quicker than a more advanced approach.

So let’s start with some basics:

What is Activity Based Costing?

Also commonly known as ABC, simple activity based costing lets you calculate the aggregate cost of a given set of activities, in other words a process. This means the total cost of all the inputs such as materials required, time taken and the cost of people.

You use activity based costing to calculate the costs for each activity and add them together to get the total cost. This allows you to quickly identify problems in the process.

Often referred to as bottlenecks, these problems typically demonstrate where too much time or money is wasted. 

One common example is where an activity is repeated a number of times because it wasn’t done properly in the first place. This is called rework and happens when the work isn’t carried out to the correct level of quality. The work is passed back to the person that originally did it, so that they must do it again.

Another example is when the work is excessively manual and should be simplified or automated. Think about the times you have spent manually copying data from one system to another, from emails into spreadsheets etc.

These problems, and many more, are quickly highlighted when simple activity based costing is used. Once you have your model in place you can even start to use it to simulate the impact of changes. What would happen if you removed a specific step? How much could you potentially save by automating certain activities? You can estimate this with a good degree of certainty without having to start the hard work of changing things.

What is Simple Activity Based Costing?

Simple activity based costing focuses on the basics and asks these questions:

  • What are the key activities? 
  • Who does the activities?
  • What are the costs of the people doing the activities?
  • How long does each activity take?
  • What are the direct costs, e.g. the cost of materials to complete the activity?

The benefit of keeping it simple is that you can do it quickly and still get 80% of the answer you need. Which, in most cases, is more than enough to make key decisions.

How to do Simple Activity Based Costing

To perform simple activity based costing you need to:

  1. List the key activities – the easiest way to do this is to map the process (check out process mapping guide if you’re new to process mapping).
  2. Identify who does it – list the roles against each step of the process (if more then one role is involved you may want to use a roles & responsibilities model such as RACI – find out more here).
  3. Determine how long each activity takes – this will be easier for some activities than others. If there is a high degree of variability then try to work out the most common pattern. If it can take between 1 and 10 minutes, is it more likely to take 1 minute than 10, if so, use a duration that is closer to 1 minute.
  4. List any direct costs associated with each activity – these are material costs. e.g. if you are sending out letters then the direct costs would include the cost of the envelopes, paper and stamps.
  5. Calculate the hourly cost of each role – staff may be paid hourly or through a salary so you will need to calculate the hourly rate based on how many hours a salaried employee typically works per week and how many days per year. You should also include any additional costs to the business that are incurred by each employee. This may include tax, pensions, health insurance and any other benefits that give you the true cost of an employee.

Once you have all the information above the cost of each activity is calculated by:

(Duration X Hourly Cost of the person performing the activity) + Direct Costs = Activity Cost

The sum of all activities will give you the total cost of the process.

Simple Activity Based Costing with Skore

Skore software is designed to make it simple and easy to map and analyse business processes. You can map a very simple process quickly with all the key steps and people displayed visually.
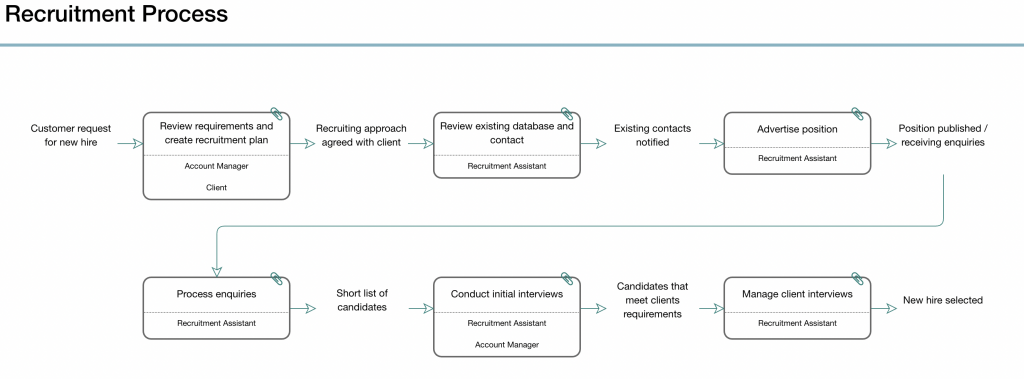
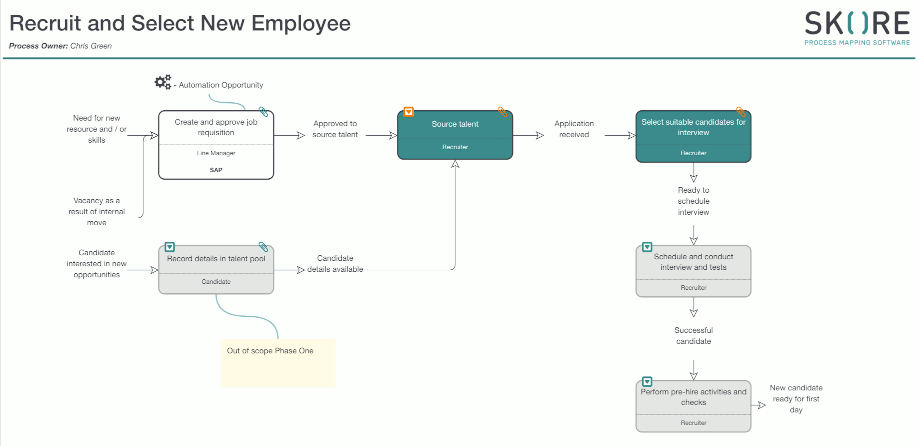
Recruitment Process Mapped in Skore

With Skore you can easily enter the durations and direct costs against each step in the attachments panel. Then you can add the hourly cost against each role.
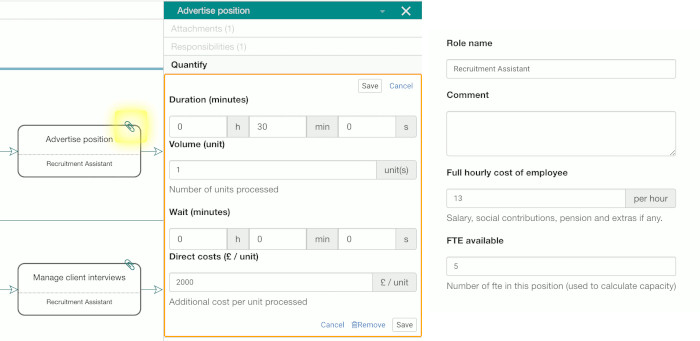
simple activity based costing forms in Skore
Forms used to capture activity duration and role costs

As soon as you enter this data the Quantify dashboard in Skore will show you durations and costs of your process. It also provides further analysis to help you understand the breakdown of costs at each step. This is based on whether it relates to role costs or material costs.
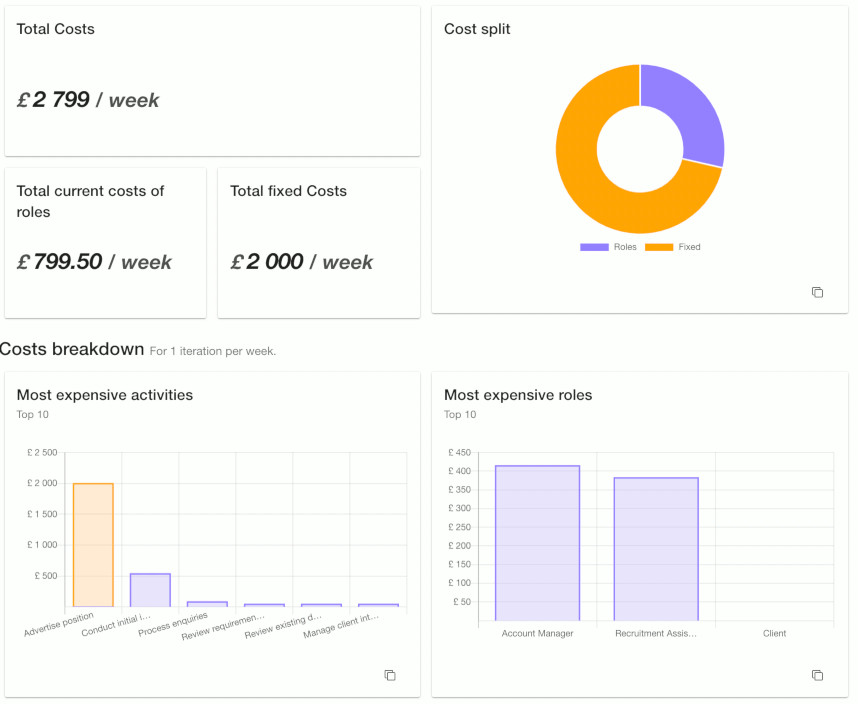
simple activity based costing dashboard in Skore
Costing Dashboard in Skore Quantify Module

Once you have this view of the process costs you can start to experiment by removing activities or changing roles to see the impact on cost.

Skore also provides further insights to help you identify bottlenecks and even simulate the impact of changes in capacity. 

To learn more about Skore Quantify check out these videos for a complete overview.

What to Remember

Simple activity based costing is a powerful tool to help you quickly identify ways to improve work in your business. More than that, it will help you build a compelling business case for fixing problems or making things even better.

  • Use simple activity based costing when you believe a process can be improved but you’re not sure how or need to justify the cost of fixing it.
  • The data you use does not have to be perfect but it should be close to what happens most of the time.
  • The power of simple activity based costing is not to give you exact durations and costs, but to allow you to see the size of changes. In other words, are you making a 10% cost saving versus a 60% cost saving.

Want to learn more about using Skore to deliver world class improvements to your business? We’d love to hear from you and share more about how we can help you achieve your goals. Take a free trial to get started.

Start Your Free Trial Today

How to Avoid Process Mapping Mistakes

Process mapping is one of the most powerful tools for problem solving, investigation and generally improving businesses. However, many of us still make simple Process Mapping mistakes. It is for this reason that stakeholders and subject matter experts can sometimes be resistant to take part or support you.

To make things as easy as possible, do your best to avoid these most common mistakes when process mapping.

1. Using the wrong approach

There are many different ways to process map from basic flowcharting, Universal Process Notation (UPN) or even Business Process Modelling Notation (BPMN). They each have their own strengths and weaknesses, so make sure you have chosen the right one.

If you’re working with a technical audience, mapping processes that require technical data, then BPMN might be a suitable solution. But imagine if you are working with busy, non-technical business stakeholders. They will not have much patience for processes using a complex array of shapes and symbols that they don’t understand. A common process mapping mistake is to assume that everyone understands the same things that you do.

With this sort of audience you’re going to want to use something much simpler. Something they will find easy to read with very little to no training.

You should also consider how you are going to use technology to map the process. Are you going to map the processes straight into a software tool and share them at the end of the workshop? If that’s the case then an approach like UPN is going to be much more effective.

UPN is so simple you can use it to map the process directly into your software in a real conversation. And you can do this without interrupting the flow of thought. At the same time it is rigorous enough to capture all the details required for virtually any project.

If you are working with lots of different stakeholders, from different teams, then it’s best to choose just one approach. This should be whatever suits the least technical person in the room.

Skore has been designed to map processes at the speed of conversation in live and remote workshops – take a free trial and try it out today today >>

2. Not being clear about the purpose and benefits

To get your stakeholders to take part you need to give them a good reason to do so. You might be able to get people to agree to a short meeting without any reason but if you’re asking them to give up several hours they need to understand the concrete benefits. Many people make the process mapping mistake of not being clear enough from the very beginning.

You normally map processes as part of a wider change initiative, project or programme. We recommend therefore that you start with the objective and benefits of that project. The chances are the stakeholder has already heard about it but there’s no harm in repeating and aligning yourself to it.

Next be clear about why process mapping is needed and why these stakeholders input in particular is required. For example – is it because you are trying to uncover the existing pains in the process? Trying to build a business case for changes? Or identifying the key requirements for a new system?

Finally, share with them any benefits that will directly impact them. Are you removing problems that directly affect them or making some part of their role easier in the future?

Stakeholders are much more likely to engage if they can see a clear benefit that directly affects them.

Check out our guide for preparing and running process workshops >>

3. Not agreeing the title and scope up front

Once your stakeholders are aware of why you’re mapping their process it’s time to be clear about exactly what you will be mapping. Take your time to consider the following – which process are you asking them to tell you about? Is it something high level such as the sales or marketing process? Or is it going to be something more detailed like completing an order?

The scope of the process tells everyone where it starts, i.e. what triggers it to begin, and where it ends. Start mapping without a scope defined is a guaranteed process mapping mistake. Firstly you’ll waste a lot of precious time at the beginning of the workshop discussing this. Secondly, you will find the conversation going way outside the scope of the process again which can frustrate and disengage your participants.

You don’t need to agree on the perfect scope up front because you’re unlikely to know what that is until you’ve mapped the process. However you do want to start with something that helps focus everyone on this process and not to go off in different directions.

This simple How To guide introduces the basics of mapping processes >>

4. Not involving the right stakeholders

Without the various stakeholders and subject matter experts there would be no process to map. In addition we would suggest identifying and involving the right stakeholders in the first place is as important as knowing which process to map.

Having identified the process, the objectives, benefits and scope you’ll probably have a good idea about who the first people to invite are. They’ll be the real experts and people with the knowledge of how things actually get done. But don’t make the process mapping mistakes of not considering who is missing.

Having the experts in the room is great, but having someone that actually feels the pain of the process will be invaluable. Whether it’s someone doing the process, or someone on the receiving end, they will be able to articulate the issues from a personal level. This will help with how you communicate that to others in a recognisable and human way.

Another type of stakeholder that’s worth involving are those that are influential within the teams. They might not be very senior but they are the sort of people that others will listen to. Finding and involving these people will help you understand how they are likely to influence colleagues. Getting them onboard with any change will reduce the chance of any resistance as the project progresses.

5. Taking too long

Everyone’s time is precious and if you’ve put all the effort in to get everything else right you definitely don’t want to squander it by wasting people’s time. To make things even harder you have a very narrow window in which to keep people engaged. 

As soon as everyone leaves the room after a workshop they will be focused back on their day jobs and all the useful discussion around the process will quickly fade away. If you need to follow up with additional questions or require further feedback from the participants you need to do it quickly.

If you plan to capture the discussion as notes and then write the process up afterwards be sure to start immediately after the workshop has finished. You want to get the process map out to the participants within hours of finishing while it’s still fresh in their minds.

Ideally you capture the process with them live during the workshop and straight into a tool so that the maps can be shared straight away at the end. But here too you need to be careful not to waste time. Avoid the situation where the participants are waiting around for you to put boxes on the screen and move them around. They will quickly lose interest and engagement.

Either have someone else in the room mapping the process in another tool, so that it can be shared at the end. Or, use a UPN based software such as Skore that can be used to map the process at the speed of conversation. This ensures that the discussions flow easily, everyone can immediately see the process represented and can access it the minute the workshop is finished.

Want to learn more about how to use Skore to capture and analyse processes live in a workshop? Why not take a free trial>>

Avoiding Common Process Mapping Mistakes – remember this!

The most important thing to remember, when embarking on a process mapping exercise, is that your stakeholders and subject matter experts are the most important piece of the puzzle. Without them you cannot get an accurate picture of the process.

Not only that but if you don’t get them on board with what you’re doing they will be resistant to any change that results from the work you are doing – and that is one of the biggest process mapping mistakes to make! It’s essential to put them first and think about how you can make their lives as easy as possible. The more you make it easier for them the more they will make it easier for you.

Looking for a powerfully simple solution for process mapping, analysis and improvement?

Start Your Free Trial Today

How to map a To-Be Process

In this blog we’ll explore how to create your first to-be process. We’ll also make sure that you include all the information you need to ensure your process map is a success. To understand how to map a To-Be Process, we first need to make sure that we’re clear about what we mean by a to-be process.

In the world of process mapping, and process improvement, To-Be process mapping is all about designing new processes that the organisation isn’t doing today. Another common name for To-Be processes is ‘Future state’.

This is the opposite to an As-Is process, which is a process map of what’s happening right now or what we call the ‘Current state’.

Before we start looking at how to map a To-Be process you may want to check out some of our related guides:

Consider this before you start mapping your To-Be Process

First things first, do you know why you need to map a to-be process? To understand how to map a to-be process you must understand what outcome or goal you expect this new process to deliver.

Let’s take an example, imagine you are implementing a new Customer Relationship Management (CRM) software to support the work of your sales team. The goal of this future process might be to make it easier for your sales team to gather and analyse intelligence on customers and prospects. It could also make reporting easier so that sales aren’t spending lots of time creating reports when they could be out selling.

So now you know why you’re designing this new process and can get started. Bring the team together to brainstorm ideas including experts from your sales team, IT and anyone who has involvement in the process.

These ideas will be your guiding principles once you start mapping your To-Be process. Once you’ve learnt how to map a to-be process you can check your process against these ideas. It will be easy to see whether you have achieved them or not.

How to map a to-be process

With the goal of the process, and your ideas and design principles laid out, you can start mapping your To-Be process. As this is a new process it’s important to focus on the work required to deliver the goal.

One tip is to avoid talking about who does the process until you have mapped out all the work. This helps prevent the team from reverting back to the current process and focuses on what you want to achieve in the future.

To start you should map out the key activities in the process. Map out the steps required to reach the goal and the order they happen in. With a To-Be process it’s often easier to start with the very high level steps, or stages, and then break them down into detail later on.

Skore Process Map showing How to map a To Be Process.

A high level process captured in Skore

Want to know how to map a process? Check out this short ‘How to map processes’ guide here.

Define the perfect roles

Only once you’ve mapped out all the activities in the process should you start thinking about the roles that are needed to perform them. Again, it’s highly recommended that you start by avoiding the job titles that people have today and think about what an ideal set of roles would be in perfect future.

Remember you can start this activity as a discussion to list out a set of roles and then apply them to the process map. This involves working through the process again and assigning at least one role, or system, to every activity.

Refine the roles

Your to-be process map is now almost complete. However it’s important to review the roles you’ve applied to ensure they make sense. In other words, look at all the work each role has to do in the process. Check – does each role have enough work? Or, do some roles have too much work?

If possible use a software that extracts the roles from the process, or can provide a visualisation of the roles against the processes, such as Skore.

A Skore Dashboard showing Roles and Responsibilities Analysis

Roles and Responsibilities analysis in Skore

Want to see how this is done in Skore? Check out our People change management guide here.

Review each role and then adjust them so that they make more sense. Start with the roles that have too many tasks and start to share these out to roles that have fewer. Then look at the roles with very little work and see if that can be done by others.

What else do you need?

The final thing to consider is what other information do you need to gather for this process. That will depend on why you are mapping this to-be process. If we take a look again at our example of the CRM we could consider what key requirements from the system we need. These could be reports and therefore we would need to consider what sort of data needs to be collected and in what steps of the process.

You can then work systematically through the process to ensure you have everything you need to start building and running your new process.

Things to remember

When learning how to map a to-be process it’s a bit like looking into the future. You’re creating a model of what the work will actually look like when it’s up and running. To get there in the shortest amount of time and with the least number of problems then it’s worth applying these key things:

  • Be clear about the goals and objectives for the To-Be process and check back often to make sure the design you are creating will deliver them
  • Always define the activities BEFORE the roles, this ensures you don’t confuse what’s happening today with what the future will look like
  • Go through your design several times to ensure it makes sense. Following the steps above, in this order, will give you plenty of opportunity to adjust and improve the design before it’s finished

Want to quickly engage stakeholders with a simple approach that can be used to map and analyse processes live? Start your free trial with Skore today.

Sign up for your free trial

As-Is vs To-Be: Where do you start?

Whatever the reason you are mapping processes, it is essential that you are clear on whether you are mapping the As-Is or the To-Be process. In this article we explore the difference between As-Is and To-Be and provide a series of questions to ask yourself to help decide.

We’ll help you determine whether you need to start mapping the As-Is process or whether it’s safe to jump straight to the To-Be. With this information you can confidently agree the approach BEFORE you start working on the processes and avoid distracting and time consuming debates at the beginning of a workshop.

    Get Your As Is Vs To Be Guide Here

    What do we mean by As-Is and To-Be?

    Let’s go back to the very beginning and make sure we’re clear about how we define As Is and To Be. In this case we are talking about business processes and the need to map and understand them. 

    As-Is process mapping is about understanding the here and now. It tries to answer the question;

    • What is happening in this process right now?
    • How does it work today?

    As-Is process mapping is also known as the Current State and can include lots of other information about the business.

    To-Be process mapping is where we start to explore the future. This time it’s trying to answer the question; 

    • How should this process work tomorrow?

    You may hear To-Be process mapping called Process Design, or Future State mapping. It might be that we are making minor improvements to an existing process, or designing a process that doesn’t even exist today.

    The disagreement many have is whether there is value in spending time documenting the As-Is or whether you should jump straight to the To-Be. As we discuss today this decision really depends on the individual project but it’s up to you to make that clear from the beginning. 

      Get Your As Is Vs To Be Guide Here

      Why are you mapping processes?

      The first thing you need to ask yourself is – what are you mapping these processes for? These typically break down into the following types of process mapping; 

      • investigation to see what can be improved 
      • documenting for compliance / quality / training reasons,
      • understanding requirements for an improvement or designing a completely new process.

      Be aware that only designing a completely new process can legitimately have a case for going straight to a To-Be. Even if this is the case, you’d need to do some investigation beforehand to understand what the business already knows about this area. You may need to understand if there are any constraints but this doesn’t necessarily require process mapping.

      Mapping processes purely for the purpose of creating and maintaining documentation, such as for training or consistency reasons suggests an As-Is approach. However, you may well be documenting processes for the first time. In which case you are capturing As-Is processes but with small improvements as the teams come together and learn from each other and discuss the best way to do things. You are building a future state process but I tend to call it the As-Is Plus.

      The other two types of project, investigation and requirements gathering absolutely need some degree of As-Is capture and analysis.

      There may be a problem in recognising the value of conducting the exercise. It can be time consuming and focuses too much on the past when everyone is excited about the future of the project. However, it is important for us to understand the here and now so we can understand what needs to change.

      So any project that aims to change the way something works today really needs some level of As-Is understanding.

      Do we really understand today’s problems?

      Building a shared understanding of the problems you’re trying to solve is essential for success. When we understand today’s problems people will buy into the need for change. However one of the biggest challenges here is whether people have the same perception of those problems.

      People normally describe problems in terms of the symptoms they experience. As analysts, part of our job is to help identify the root cause of those problems. But if we do that away from the stakeholders they will still see the symptoms they experience as different problems. Our job is to show stakeholders how a solution will solve the problem and relieve their symptoms.

      One of the most powerful aspects of process mapping in a workshop environment is that it aligns people firstly around the work that happens and then gives them space to have a conversation about it.

      Understanding today’s problems is not just about the project team, it’s also about ensuring everyone else shares that understanding. As-Is process maps are a powerful way of investigating and validating problems with the wider business. Indeed that workshop you organise and the conclusions you make together is key to ensuring that everyone is on the same page going forward. 

      Is there a clear business case for all stakeholders?

      Having identified and clarified the problems it’s possible to build a business case for improving. The impact of those problems can be measured and then used to assess the viability of potential solutions.

      The point here is to ensure that there is a clear business case at all levels. A business case that increases revenue or profits is great but if it requires individual stakeholders to work harder with no additional pay they may not be so keen to implement it.

      This is why having alignment on the problems is so important, it allows you to understand how each problem impacts individuals and therefore create a clear business case at each level.

        Get Your As Is Vs To Be Guide Here

        Are all the constraints and risks understood?

        Many projects miss important deadlines when a key constraint is only identified in the final stages. Constraints could be anything from legal requirements to legacy technology and it’s essential to know what these are as early as possible.

        Shows a part of the Skore Process Map with a comment and not on it.
        Notes made on part of a Skore Process Map

        Again, one of the most powerful aspects of As-Is process mapping is that it provides a simple clear language for lots of different stakeholders to align against. This makes it that much easier to have focused conversations about what might prevent any solution being implemented.

        Is Change Management required?

        Here we focus on implementation plans. What do we need to know to make sure that the project will be a success, where are the gaps and how are we going to fill them?

        The only way to truly identify the gaps is again to understand how things work today, who does them and what with? That is an As-Is process. You need that in order to compare it to your To-Be to identify the gaps in personnel, skills, systems and so much more.

        Conclusion – As Is or To Be?

        If you answer yes to any of these questions the chances are you need some sort of As-Is process before continuing, The cost of not doing so can be expensive. It is your role to ensure that the business understands the value in taking the time to go through the As Is. The key is to address that question up front, as part of your introduction: “today we are here to map the …. because this will give us ….”Making sure that is understood before your workshop kicks off will save you valuable time and ensure stakeholder satisfaction. 

        Skore has been designed specifically to make process discovery and analysis easy. It uses UPN (Universal Process Notation) – the simplest way to describe a process. This means that everyone can understand and create a process map. All you need to know is how to describe what happens and why. Its simple to map out processes as people describe their actions.

        Any data such as roles, software used, durations, costs, risks, requirements and many more can be captured against the process and generate rapid insights. This not only makes As-Is capture much quicker but also quickly identifies opportunities for your To-Be design. You can find out more by getting in touch below.

          Get Your As Is Vs To Be Guide Here

          How to Map an As-Is Process

          Need to know how to map an As-Is process? In this blog we’ll provide the answers to:

          1. What question(s) should you be asking/ What is the purpose of your As Is mapping?
          2. What’s the scope?
          3. Who needs to be involved?
          4. How much detail you need?

          Mapping an As-Is process is all about understanding and clarifying how things work today. We map the As-Is process to create a process manual or quality management system, to identify improvements or to gather information such as requirements for a new system.

          Not sure if you need to be mapping As-Is or To-Be? Check out this article to help you decide which one you should be doing.

          Purpose

          Firstly, make sure you start at the beginning – you need to be clear on the purpose of the As-Is mapping exercise. As mentioned above, make sure everyone understands why you are doing this. 

          Ensure you involve the people you need to get their input into the process.  Having an agreed purpose and objectives will make it much easier to explain why you need their help and time. Think carefully about how the objectives will also benefit the individuals involved as well as the company. This will help you to get support and engagement from them.

          Then, before you start mapping the As-Is process, think about the specific question you are trying to answer. Having this question ready and visible during the process mapping will help keep everyone focused and help you reach your objective.

          Need a reminder about Process Mapping? Read our handy guide here

          Here’s an example, imagine you are implementing a new Customer Relationship Management platform. Your purpose may be to automate manual activities in order to improve customer experience and increase the volume of sales that can be handled at any one time.

          The benefits to the company are increased sales and improved customer satisfaction. The benefits to the individuals in the process are; less time doing boring manual activities, less chance of mistakes happening and more sales (more commission). This is what you need to define and make clear to everyone involved.

          The Key to How to Map an As-Is Process

          Therefore the As-Is process mapping is all about understanding where these manual activities are, identifying common problems and exploring opportunities for improving the process through the new technology. So the question(s) to answer in a process workshop could be:

          • What are the must have requirements for the new system? (i.e. what can we not do without?)
          • What are the main pain points today?
          • What are any potential solutions to these?

          The questions are in order of importance so when the workshop reaches the end you can ask whether each question has been answered and if not what follow up work is required to complete it.

          Try Mapping an As-Is Process for yourself – Free in Skore

          Scope

          Just as important as the Purpose is getting the Scope right. Determining the scope of your As-Is process is about being clear on what process it is, i.e. the title, where it starts and where it finishes.

          Setting the scope will help you identify who you need to talk to and also keeps everyone focused on the most important area. The title of the process depends on which area you are looking at but if we continue with the previous example it would be the Sales Process.

          Make sure you avoid these common mistakes when mapping processes >>

          When using Skore, for mapping and improving processes, we recommend that you also consider the level above the process you want to map. This helps to understand the context and also identifies any other potential processes that may impact the one you are mapping.

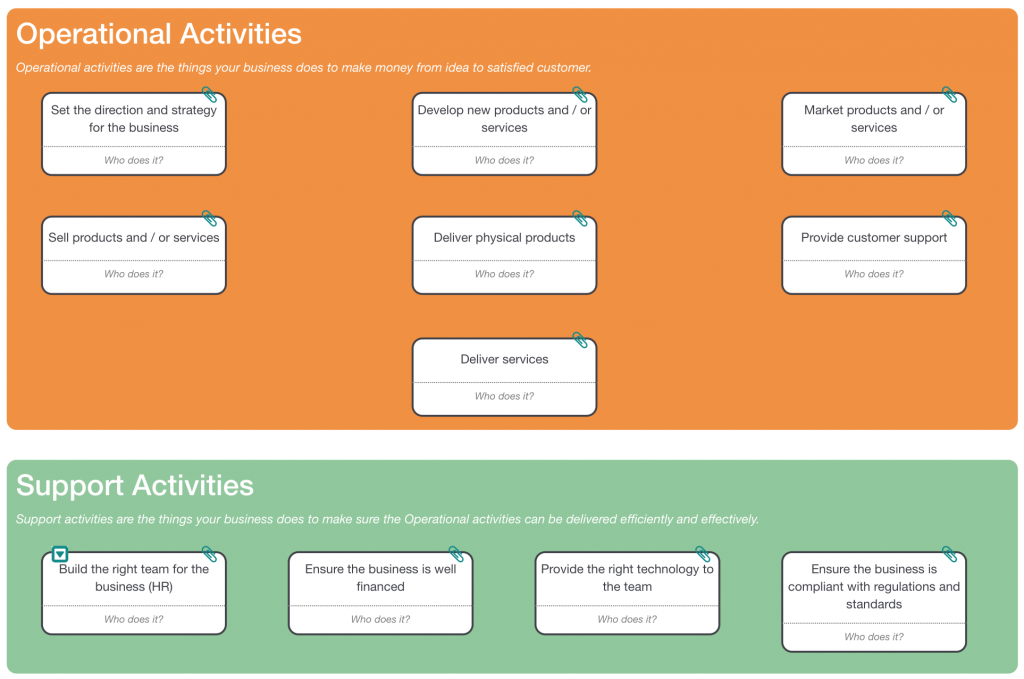
          Therefore, in our example, the next level could include the following processes; Marketing, Sales, Order Processing, Delivery, Billing and Aftercare. 

          Skore's Business on a Page for describing activities. Use this to understand how to map an As-Is Process
          The Business on a Page Template from Skore which allows you to capture different processes in your organisation.

          As a result, the team can see the Sales process but it allows them to also consider whether the new CRM needs to support other parts of the process where the company interacts with the customer.

          Stakeholders and Influencers

          Put simply, who do you need to involve when mapping the as-is process? Most obviously you need to include the subject matter experts, these are most likely to be the people that actually do the process. In addition it could also include the process owner as well as someone from IT with knowledge of the systems currently in use.

          Depending on the process there could be a lot of potential stakeholders so you will need to consider which of those are best suited to take part. You can run focused workshops with a small number of people (read our guide on How to run a Process Mapping Workshop here) and then share the processes afterward. If using Skore you can use the commenting feature to gather feedback.

          Consider who the champions and influencers are. These are the people that others will follow. They may not necessarily be in management or leadership positions but are often found bringing new ideas and getting colleagues bought in. They are often seen as experts and the ‘go to’ people. Getting these people involved early will really help bring everyone else along on the journey.

          Additional Information

          Capturing the As-Is process is one thing but what other, related information, do you need to capture. As-Is process mapping is all about looking at the current state, or how things work today. As well as the steps in the process you may also need to capture:

          • Roles
          • Systems
          • Issues and pains
          • Improvement ideas
          • Risks
          • Control points
          • Rules
          • Documents
          • Policies

          And there could be many more. Remember that you will have limited time and you will have set a question that needs answering. Stay focused on your original objective. What additional information do you need to capture in order to answer the question?

          Be prepared to capture that information in a structured way that is easy to refer back to. This could be a spreadsheet or database. If you’re using Skore you can capture this information directly against the process steps using Custom Fields which will then allow you to quickly report and share them at the end of the workshop.

          How to map an As Is Process - capturing additional information in Skore
          Capturing Additional Information in Skore
          Insight based on Additional Information generated in Skore

          Sharing and Feedback

          After the workshop it’s important to share the processes and any related information. People will often remember important things afterward so it’s essential to have a way of capturing those and incorporating them into the process later on.

          Again Skore makes this easy by using the commenting feature to capture additional information and feedback from others. This can easily be added to the process and everyone will instantly see the updates.

          Conclusion

          Capturing the As-Is process is an important first step for a variety of projects. It helps understand what’s happening today and identify the main problems that need to be addressed before making any changes and improvements. However, capturing an As-Is process involves collecting and making sense of a lot of information so it’s essential that you are prepared.

          How to map an As-Is process successfully is based on having a good plan, being clear about the purpose and involving the right people with the right tools. There are many tools available to help you gather this information, we’d recommend taking a look at a platform like Skore. Skore was designed to be used by everyone in an organisation and its simple two shape system means you can get mapping quickly and bring all your information together in one place. 

          Try Mapping an As-Is Process for yourself – Free in Skore

          Using Skore to Deliver the People Side of Change Management.

          Are you implementing a new system, designing a new organisation or improving business processes? If so, you need the right people in the right place with the right skills or your efforts are likely to be wasted. 

          At Skore we’re passionate about making people the centre of everything related to process change. That’s why Skore has been simply designed to make people-led change a core part of process improvement. Whether you’re trying to build a case for change, get buy in, understand training needs and/or recruitment, there are a number of tools available to help you.

          In this article we cover the following topics to show you how Skore’s simple software can help you deliver successful people-led change.

          1. Set clear objectives
          2. Get buy in early
          3. Roles and responsibilities (e.g. RACI / RATSI)
          4. Skills and competencies
          5. Job descriptions
          6. Org charts
          7. Make change stick (giving people confidence – landing pages and training aids)

          Set Clear Objectives

          Whatever change you’re making be clear about what you’re trying to achieve. Setting clear goals and objectives, that everyone understands, is key to ensuring you are aligned.

          Having a clear objective from the start means that in a workshop or training session people understand why you are changing something. There will be a lot less resistance if individuals and the organisation understand why they need change in the first place. 

          Then translate them into the specific questions you’re trying to answer during investigation (discovery) and design workshops. A really effective way of doing this is to present a question that needs answeringin the workshop.

          For example, if you are embarking on a software implementation project you need to define why the system is required and the high level benefits for the individuals involved. As part of your investigations you’ll run As-Is workshops (read more about As Is vs To Be here) to understand the current issues in the process.

          This can be framed as a few questions such as:

          • What things are slowing us down?
          • What is preventing us from improving quality?
          • What do we find frustrating?

          Make this visible during the workshop to remind everyone what is important to focus on.

          Try Skore for yourself for free

          Get Buy In Early

          Setting clear objectives is one thing but helping individuals build their own case for change is essential to getting buy in. A brilliant way to do this is to involve them in the work as early as possible. This gives them a stake in the change, an understanding of how it will impact them individually, both good and bad.

          The Skore process approach is powerfully simple, meaning that everyone can get involved in process discovery sessions and really understand what’s going on. A great way to ensure buy in. Everyone can work together to:

          • Align on how things work today and what’s wrong with them
          • Collectively identify opportunities for improvement
          • Agree on the constraints that may impact success
          A Simple Process Captured In Skore

          A simple process captured in Skore

          Create this process framework by involving the team. Then suddenly it’s not a group or consultants or analysts doing it to them, they all have a stake in what the potential solution will look like. The same framework is used for further communications as the project progresses and further changes are made. This ensures everyone is on the same page.

          Roles & Responsibilities

          Processes are essential for helping the team align around what happens, when and why. With Skore you also build a deep understanding of who is involved and to what extent. This is really important when you want to know whether you have the right roles to make your processes work as designed. 

          By default a Skore What box asks the question “Who does it?” and by enabling the Responsibilities model you can extend this using RACI, RATSI, RAPID, or your own preferred model (find out more about RACI alternatives here).

          With this enabled you can tag the roles on each step of the process according to their responsibility level. If you are using RATSI, for example, you can tag the Responsible role with R, the Authority role with A, the Task role with T and so on. You can add as many roles to a What box as you like but remember that too many can make your process look complicated. (Tip: hide roles tagged with Support or Inform so they are not visible on the page but are still tagged against the process step.)

          People Led Change Management starts with understanding responsibilities in Skore.

          Multiple roles tagged with responsibility levels

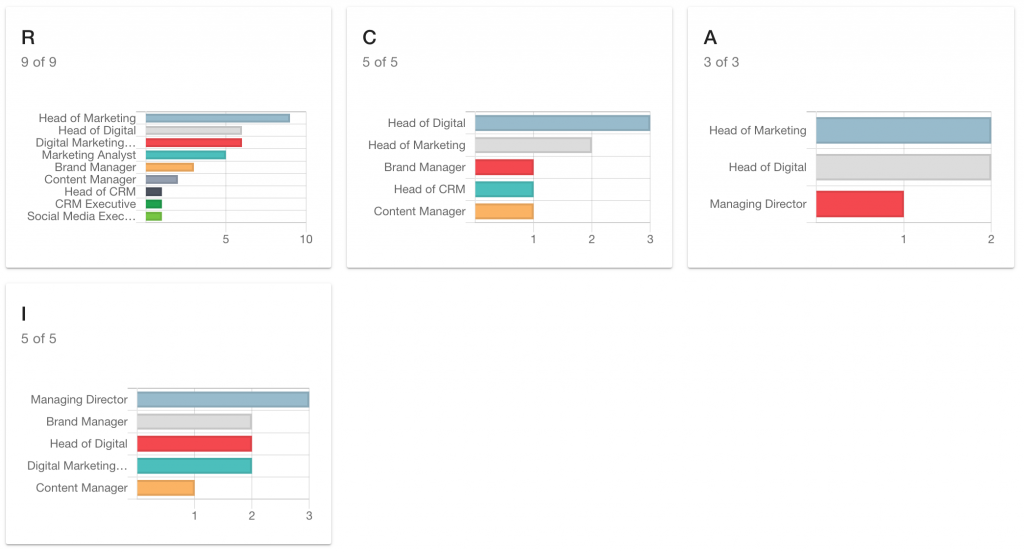
          Once you’ve added all your roles to the process go to Roles > Insights tab and you can immediately see how your roles stack up.

          Insights tab shows responsibility levels and helps improve People Led Change Management

          Roles > Insights tab showing responsibility levels across different roles

          This view shows you how often each role has been tagged by each responsibility level. In RATSI the A (for Authority) shows who is responsible for key decisions. In this example you can see that the Marketing Director is the only role by design. Key decisions are kept to a minimum in this process and therefore as few people as possible need to have that authority. You may wish to represent lots of decisions, in which case you could use this view to ensure that no single role has to make all the decisions.

          We see that the Marketing Manager has both a large amount of Responsibilities and Tasks. Therefore we would recommend reviewing that role to determine whether it actually needs to be divided into two or more new roles.

          Whatever you do with the insights provided, you can change the process immediately and your change will be instantly reflected here. If you need to review individual roles use the Role Description on the main Roles tab.

          Skills and Competencies

          When changing a process, adding new activities, or creating a whole new process it’s likely there are going to be gaps in the skills and competencies of the existing team. Use Skore to identify these gaps and create job descriptions later on.

          In Skore we ask what competencies are required for an individual piece of work without having to consider the role involved. By focusing on the activities we can objectively agree what the right competencies are required to deliver the desired outcomes.

          Screenshot shows the individual competencies that can be added to a what box in Skore

          Individual competencies attached to an activity

          Here we can see competencies have been added to the activity using Custom Field attachments. This activity has two competencies associated with it. You would review each activity in the process and add competencies as required.

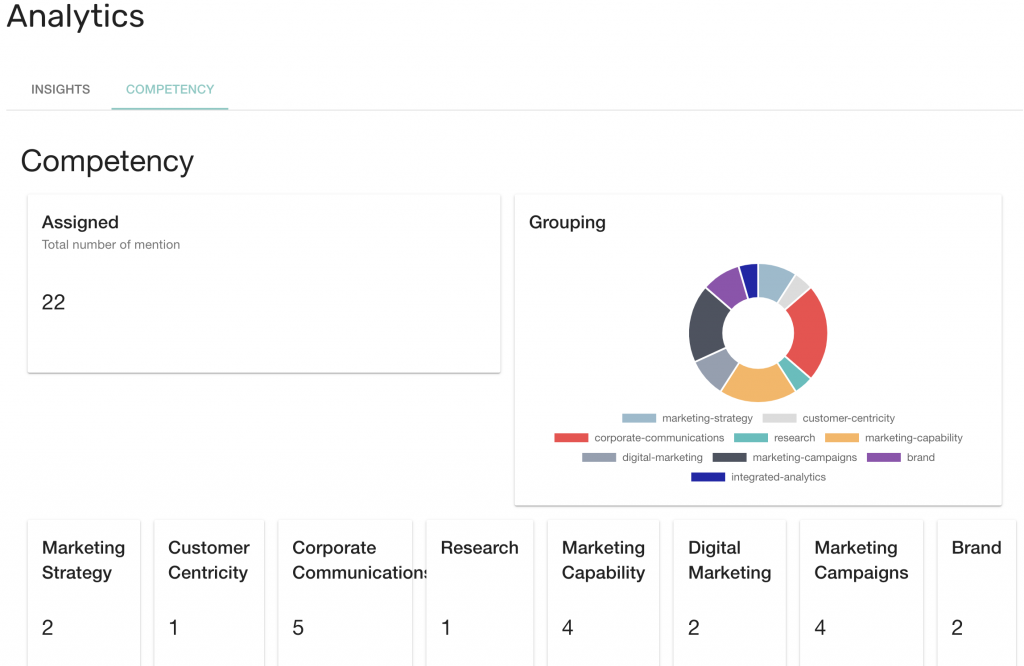
          Now we can go to the Roles tab and this time we select the Competency tab. The Competency tab is automatically generated as soon as you start adding competencies to the process.

          Insights generated by Skore to show the number of Roles by number.

          Roles by number of associated competencies

          Here we can start to see how different competencies cluster around different roles. Fewer competencies generally means roles are much more specialised whereas large numbers of competencies indicate a more generalist role.

          Again this view shows that the Marketing Manager has a large number of competencies compared with other roles so we can legitimately ask the question whether it’s feasible that one person could have such a broad skill set. This may be further evidence that the Marketing Manager role needs to be redesigned.

          Note. This example does not include the minimum level of competency but this could be added to Skore if required.

          Job Descriptions

          With the information gathered so far it’s now possible to start creating accurate job descriptions. For this you will use the Role Manager in the Roles tab. The Role Manager lists all the roles in the process and shows how often they appear. Selecting a role will show you the detailed Role Description on the right hand side.

          Skore Software generating role descriptions. In this case a Marketing Manager.

          Role Manager View

          The view above shows the role description for the Marketing Manager. Many roles will directly translate into a job description while other job descriptions may be made up of multiple roles. In the Marketing Manager example the description lists all the activities and their responsibility level.

          The Custom Field section will show you the list of competencies that this role requires to carry out the activities it has been assigned. This should be the full list of competencies required for the job.

          Image shows a competency list created in Skore.

          Competency list for the selected role

          The Collaborators section tells you which other roles the Marketing Manager is working closely with. This is determined by how often each role appears on the same activity as the Marketing Manager. The higher the count the more they will interact.

          Other roles that collaborate with this one

          Finally you can see how this role interacts with others through handovers. This is another form of interaction where the role is passing over finished work to another part of the process, often outside of their team or department.

          Handover view of the Marketing Manager as shown in Skore

          Handover view of the Marketing Manager

          With this information it is now possible to create a job description that is directly connected to the work described by the process model.

          Organisation Chart

          The job descriptions created in the last step provide a basis for developing your org chart. They will give you a good sense of the level of responsibility, the level of skills and knowledge as well as the types of activity they are involved in. Assembling the org chart may require some work but is easily carried out in Skore using Note boxes and Icons.

          A descriptive and colourful Org Chart in Skore using Notes functions.  Show how your people will be affected by Change.

          Org Chart in Skore using Note boxes and Icons

          Make Change Stick with People Led Change Management

          Even after you assemble the team and start implementing your change things will still be new to everyone. Regardless of experience and skill level these are new ways of working and not everyone will remember everything from day one.

          Set up training on the key process changes and any new technology. Using Skore, create User Manual versions of your new processes so that everyone has easy access to the new processes and any supporting material.

          Processes need to be easy to find so that people aren’t left frustrated and not able to figure out how to do simple things. There will always be challenges during implementation but the aim is to make it as easy as possible.

          Create landing pages in Skore that make it easy for people to find this information in a simple and friendly way. Landing pages are easy to make using images and links to the appropriate processes.

          A landing page created in Skore to inspire people in your organisation to adopt change.

          A simple landing page to make it easy for users to quickly access their processes

          Add additional information to processes to make it as easy as possible for people to find the actual information they need. This could include links to documents, forms, policies, apps or even instructional videos.

          How to add video links and extra details into a Skore map. This helps to encourage People Led Change Management in hour organisation.

          Video tutorial embedded in a Skore attachment to support users through change

          Finally you can use the collaboration features in Skore to gather issues in the process as users come across them. The Skore processes really become the communication medium between those doing the process and the support team helping them through the change.

          Conclusion

          Delivering change without spending enough time considering the impact on people is always going to be dangerous. Without the right people, and without getting them behind the change it’s unlikely to deliver the expected results. That’s why Skore has been designed to make it as easy as possible to engage with people and provide an unrivalled set of tools that allows you to align People, Process and Technology all in one view. Deliver change with your People on board and you’re on the route to success.

          Start Your Free Trial

          Why do we map processes?

          Why should you bother to map processes? Process mapping is an incredibly powerful tool for understanding what’s happening in a business. Without it your project or programme is at risk of falling apart.

          Let’s start with the basics; we map processes to help understand how things work today, or to design how things should work in the future. A process map, or flow chart, provides a visual representation of a set of activities and outcomes.

          Processes documented in text are very difficult to read. A visual process map makes them easy to read. It’s especially useful where a process has multiple pathways, where different things happen in parallel, or different events can trigger different sets of activities.

          Typically we map processes as part of projects or programmes such as:

          • Systems implementation
          • Standardisation
          • Compliance
          • Continuous Improvement

          A good process will show the key activities, the outcomes and the roles that are responsible for those activities. More detailed processes can also include; responsibilities (e.g. RACI), systems, requirements, risks, issues and control points among others.

          Need to know more about Process Mapping? Read our guide here

          To map processes helps us to understand how something works, or how we want it to work, but what exactly does it help us understand? What should you be looking out for when you map process? It breaks down into three things:

          • Alignment
          • Opportunity
          • Constraints

          Understanding each of these will ensure you get the most out of any process mapping exercise in the future.

          A simple process map in Skore used to quickly align people in live workshops

          Alignment

          For processes to run smoothly, everyone involved must be aligned. In other words, they need to agree how it works. Mapping out the process, in a workshop, shows us whether this is indeed the case.

          The process map ensures that everyone is talking the same language early on and has the same understanding. They comprehend the problems they currently face, how they describe them and any future benefits to fixing it.

          It’s vital to get alignment early, get everyone onboard, and keep everyone aligned by referring back to the processes throughout the project.

          Opportunity

          Looking at any process is a chance to improve it. It could be reducing cost, removing unnecessary steps, simplifying, reducing risk, speeding it up or any number of other things. When subject matter experts get together to map out a process, and create that common language, it is much easier to talk about improvements.

          Therefore the team needs to ask itself what the opportunities for improvement are. These could be general, such as simply removing waste from the process. Or they could be more focused on something specific like automating the process.

          In large and strategic change programmes, opportunities should be looked at through the lens of the programme objectives. What improvements can be made to help achieve the goals of the programme?

          Constraints

          Whatever change you intend to make must be made within the constraints of the business. Some constraints will be more obvious than others, for example, time, budget and resources. It is process mapping, and the discussion around the process, that helps to reveal the hidden constraints that could trip the project up later on.

          These could be anything that prevents the change being a success if not managed correctly. Issues and risks are the most common. A change may be held up simply if standards and compliance requirements impact an individual step. In process mapping workshops you discuss the non functional requirements such as security or usability requirements which are essential to success.

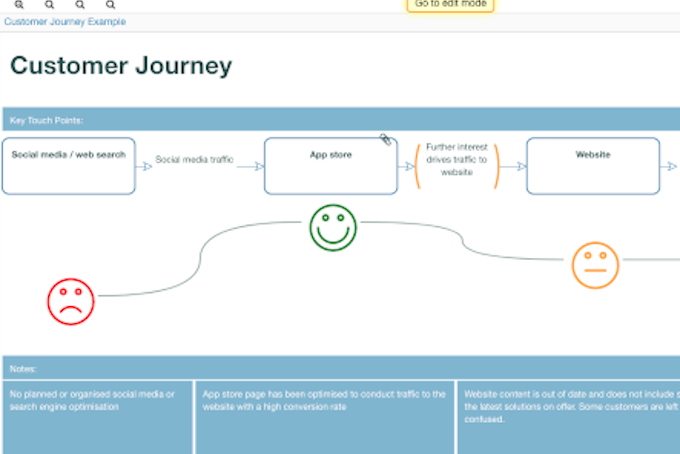
          An example customer journey map captured in Skore

          Summary

          Process mapping, and process discovery, are the key enablers to change of any kind, whether implementing standard ways of working or completely transforming how things get done. Process mapping ensures that you get alignment among the team, identify the opportunities for improvement and understand the constraints that could prevent you from achieving the desired outcome. Make sure with any process discovery session you have considered these three dimensions effectively before moving on.

          Do you need to map and/or analyse business processes? Why not take a free trial of Skore’s powerfully simple process mapping, analysis and improvement software today…

          Sign up for your free trial


          How to map your Procure to Pay Process.

          Understanding how to map your Procure to pay (P2P) process can seem somewhat daunting at first. Of course the steps already exist in your organisation, but being able to get it all down in one place can seem a difficult task. 

          In this guide we will share with you some of the basic stages you should consider and the reasons why it is so important to have a clear understanding of your process. Our how to map the Procure to Pay process will outline the steps and we’ll even throw in a free Procure to Pay template to help you get started. Just read on to find out more.

          What is the Procure to Pay Process?

          Procure to pay is the end to end process from selecting and ordering from a supplier to receiving goods/services and making payments. Historically P2P, also known as Purchase to Pay, was a manual process involving numerous parties, different requirements and countless pieces of paper. Whilst the numerous stages remain, many organisations are taking great steps to automate the Procure to Pay process. Why is this so key? As a vital component of any business, an efficient P2P process results in a healthy financial outlook, competitive strength and not to mention a honourable reputation. 

          You can break the P2P process down into different sections and there are different interpretations of this. At the end of the day it doesn’t really matter how many stages you have as long as you’ve included the fundamentals. In this blog we group them into four main categories – to keep it simple. 

          When you start to examine how your business runs its purchasing process you really need to consider the following aspects:

          Want to learn more about Process Mapping? Read our definitive guide here.

          Selection and Sourcing 

          Before you even start raising purchase orders you need to detail the system in place to identify company needs. Plus how you find and select suppliers.

          • Who do you need to speak to in the company?
          • What are your criteria for selection?
          • Do you have existing relationships with suppliers and who manages them? 

          Once suppliers are selected:

          • What contractual agreements are in place?
          • Who manages these relationships?

          In addition this also our first glimpse into compliance requirements in the P2P process. It’s vital to get this right from the Selection and Sourcing stages. 

          Purchasing and Ordering

          Once you have selected a supplier and signed the relevant agreements consider how you raise your purchase orders. It can be a very simple process, but historical and manual involvement means that it is often convoluted, confusing and wastes time. This is often due to a delay in getting sign off or a lack of clarity around your company rules and policy.  Mapping out your P2P processes is a great opportunity to see the steps involved here and whether there is room for improvement.

          • Think about how you create a requisition?
          • Who decides how much money you will spend?
          • How do you get approval from the budget owner and who enters the details into your computer system so a purchase order can be raised?
          • Once a PO has been generated how do you send it off to the supplier ready to order your goods or services?

          Read about the most common mistakes people make when mapping processes here >>

          Receiving Goods and Services 

          Next, your services or goods should arrive.

          • Whose responsibility is it to check on the quality of the goods/services?
          • How do you define if they are up to the standard you were expecting?
          • Have they arrived in a timely fashion?
          • Are there any credit notes or faulty items to return?
          • How has your purchasing experience measured up so far?
          • Most importantly who is responsible in your organisation for each part of this stage?

          Remember these are the types of questions you should be asking your organisation as you work through the process. Consider what tools you use in your organisation to measure these questions. Make sure you document them as you capture the P2P Process. 

          Invoices and Expenses 

          Finally as soon as the goods/services are delivered the payment part of the process is in motion. Invoices will be raised and entered into your accounts system. Goods or services delivered are crossed off and compared to what was ordered. Payments are made and accounts settled. You want this to run smoothly, paying suppliers promptly and without mistakes of course makes for a smooth supply chain. Once again, consider who does what at these different stages:

          • What different departments are involved in releasing payments?
          • Have you also thought about the different methods of payment your business uses to pay back suppliers?

          You also need to compare how much you forecast to spend at the requisition stage and check how much the actual amount is in the invoice. This is key to managing the company’s cash flow. This is another clear example of how learning how to map your P2P process will help with the financial management of your business and keep it healthy too. 

          At this stage you can also include details of how you deal with internal expenses.

          • How do you pay back your employees?
          • How do you keep copies of receipts and proof of payment?
          • What do you ask to see and who needs to sign these off before payment can be made?

          Expenses payments are a vital part of the P2P payment process. 

          Risks in not having a well thought out P2P process

          As highlighted in this article, the Procure to Pay process is fundamental to an effective business. Making sure you know how to map out the P2P process is key.  Not taking the time to clearly outline the process can result in many issues for any organisation including:

          Slowing productivity

          Customer satisfaction decreased because you couldn’t hire the temporary staff quick enough to satisfy demand? Products removed from your stock because you couldn’t get hold of the goods you needed to make them? All this relates back to your Purchase to Pay process. If you can’t get that right, your business can’t work quick enough. 

          Hidden Costs

          Do you really know how much you are spending on your suppliers vs the value it brings the organisation? Are you able to access this information at a touch of a button? A lack of clarity from your business means that you may not be able to track the flow of money around your organisation easily. 

          Compliance

          A purchase to pay process that has not been clearly mapped means it’s easy to fall into the trap of making mistakes or not adhering to regulations. If your organisation was audited tomorrow – could you relax knowing that everyone in your business understands the rules and regulations and has been following them?

          Communications

          Traditional approaches meant that P2P had a paper trail. How many lost purchase orders or requisitions entered incorrectly have you experienced? Do you truly know how many people are involved in the P2P process? Do they all understand the steps and requirements? If there was an issue with payment tomorrow – do you know who to speak to about it?

          Reputation

          Supplier disputes, late payments? All headaches you clearly don’t need. They aren’t great for your reputation, suppliers need paying and all of this can be avoided if you have a system in place that works well. You may not even be aware of the issues your suppliers and staff are experiencing until you take the time to map out the Procure to Pay process. 

          Successful P2P leads to Successful Organisations 

          When you look at the breakdown of the Procure to Pay Process, you begin to understand why it is such an integral part of any organisation. The delivery of goods and services are a component of every department. The success and smooth running of any P2P process is key to an efficient and profitable business. 

          Yet we still see hesitation. For many the task itself seems overwhelming. P2P affects every part of your business and at Skore we see that some people just don’t know where to start. By mapping out your process you are opening up that discussion. You are discovering your key people in this process, learning about the limitations and uncovering where your bottlenecks are. 

          A clearly defined Procure to Pay process means that:

          • You have better control of your business. 
          • The lines of communication are open within departments and everyone understands their roles. 
          • Efficient sourcing and payments will make your company more competitive in the marketplace and of course improves reputation.
          • More opportunities to uncover hidden costs and potentially save money
          • Saves time approving suppliers and creating orders
          • Safeguards your company from compliance and risk issues. 

          And these are just some of the initial benefits.  As more companies move towards automation in the Procure to Pay process, the opportunities to reduce errors and streamline the process become even greater. 

          How to map your Procure to Pay process – Free Template. 

          At Skore we understand that for some it means just taking the first steps towards a healthy P2P process. That’s why we have made our Procure to Pay Process template available and free to use. Skore’s Process Improvement Software platform was designed to be used by everyone in the organisation. That means there are no complicated shapes or terminology to learn and from the moment you start mapping the software will begin to build your analytics dashboard to help you understand where the costs, risks and opportunities are in your business. 

          The Procure to Pay process template will help you look at a standardised way of managing the process. It’s up to you to customise or change it to your own business requirements.

          If you have a Skore workspace you can add it for free or you can always sign up for a free trial and try out the process template for yourself.

          No Pains No Gains? Asking the painful questions in Change & Transformation

          When working on any change, or transformation, programme we are all familiar with the activity of gathering and documenting the pain points through Process Mapping from across the business. We understand the value of this. 

          However how much time have you spent thinking about how and, perhaps more importantly, when you capture them?

          Of course talking about, and recording, pain points is useful for many reasons. It helps to focus in on where the issues are and how the issues are perceived. It brings a human perspective, giving participants a stake in the change and feeling like they’ve been listened to.

          Starting your Process Workshops

          However, the timing and the approach you use can have a significant impact on the overall programme. In a recent webinar, on ERP Implementation, one of the consultants highlighted the challenge of starting off process discovery interviews by asking about pain points.

          “In times of change people can become suspicious, especially when an outside consultant has been brought in. We found that when we started asking about what was wrong with the current ways of working some people would become very defensive and close up.”

          Another challenge with asking about pain points, in isolation, is that they tend to be subjective. Admittedly to some extent that’s OK, because you want to see how people feel. However consider that it also means that it’s much harder to size and prioritise a problem. Remember that, different people may articulate the same problems in very different ways, making your task of deciphering them way more complex.  

          Getting the right Pain Points in Process Mapping

          Daniel Kahneman, in his book ‘Thinking Fast and Slow’, describes the concept of ‘Substitution’. This is where you are asked a complex question but in the interests of answering quickly your intuition substitutes the complex question with a simpler one that has an immediate answer.

          To put it into context, imagine you are asked: ‘what are the pains you experience in your job.’. There are probably many. Each have varying degrees of importance and impact to both you and / or the business. However, trying to first remember and then assess each of these is a complex exercise. 

          Therefore you are likely to substitute this question in your mind with something easier to answer such as “what was the last pain you suffered in the course of doing your job?”. You then list the pains and importance by the order in which you remember them. It seems logical that the most important pain is the one that springs immediately to mind but actually as Kahneman points out, this is likely to be an incorrect assumption.

          Want to learn more about Processes – read our Ultimate Guide to Process Mapping here

          Using As Is Process Mapping as a Solution

          You could consider instead running an As-Is process mapping workshop. This gives people the chance to first talk about how things actually work today. One of the most important benefits of running a live workshop is that people align on how they believe the process works. Very often people involved in a process have a different view of how it works. Therefore the problems or pains will be approached with a different set of assumptions.

          This activity allows the individuals to think more objectively about the process and its problems. It will remind them of issues that hadn’t immediately come to mind and help them re-evaluate other pains in context. The participants  synthesise and analyse the shared knowledge in order to come up with a more accurate picture of the pain points.

          Consider when to talk about Pain Points

          The next time you are planning process discovery sessions for a change or transformation programme consider when you will raise the pain points. The key to success isn’t just recognising that that pain exists at the end of the day, it’s putting it in the right context. After all, a pain point by itself is nothing, the learning it brings is where the magic happens. 

          Skore is the Process Improvement Software Platform that enables everyone to understand their processes. Our simple two shape systems means process mapping and management is even easier than ever before. Try for yourself with a free 14 day trial.

          Start Your Free Trial

          How to Map Processes

          Introduction

          In this How to Map Processes blog we teach you how to quickly create powerful process diagrams. This will help you:

          • to align your workforce
          • understand your company’s constraints
          • identify vital improvement opportunities.

          Everything we show you in this how to map processes guide can be done with paper and pens. Why not have a go and see how simple it is?

          Why do we process map in the first place?

          Business process mapping is used extensively across larger businesses throughout the world and more and more in small to medium sized businesses. Why? Process mapping helps people make sense of patterns of work that involve different people and different tools. Generally you’ll see process mapping in projects such as introducing new software to a business, reducing costs, saving time, improving quality and creating a better customer experience.

          However, with advances in technology and changes to how people create and consume products and services, now even the smallest businesses are complex. Therefore even the smallest business needs to clearly understand its most important and valuable processes and learn how to map processes. Even more importantly they should also have the opportunity to understand and access process mapping tools, just like any large organisation.

          In the following how to map processes guide we’ll show you a simple, yet incredibly powerful, approach to process mapping that anyone can do no matter how large or small your business is. What’s more, if you’re scaling up a business, the sooner you and your team start learning this valuable skill the faster you’ll be on your way to success. 

          Step 1 – Title and Scope

          First things first, before you start any process mapping you must agree the title and scope of the process you are about to map. The title is generally the easy bit, what is the process that we are going to map? e.g. Sales Process, Marketing Process, or something even more specific like the Expenses Process. Whatever you decide, make sure you clearly indicate what the process is.

          The slightly harder but very important part, is the Scope. By defining a Scope we are setting the boundaries for what we want to map. This helps to focus everyone and prevent the team talking about other areas that are not relevant… or ‘Out of Scope’.

          To define the scope you need to think about what triggers this process to start in the first place and the final output of the process. The start and end points.

          A pro tip here, you CANNOT simply write Start and End easy as that would be. This won’t tell you anything about the process and means it’s harder to stop people talking about areas out of scope.

          Get Resources to Help You Get Started

          Let’s look at an example 

          Let’s take the Sales Process. It’s different for different companies but here, the sales process starts when a new lead has been generated. So the trigger (Start) may be as simple as “New Lead”.

          Remember, it’s not unusual to have multiple inputs, or triggers, to start a process. For example, leads may come from different sources so your inputs could be; “New Phone Lead”, “New Email Lead” and “New Web Form Lead”. This is especially useful if you manage them in different ways in the process. A New Phone Lead will probably start with a telephone conversation, where as an Email Lead may require you to arrange a call first.

          The end of the process should deliver some sort of value, either to the customer or to the next process in the business. A good way to think about defining this final output is to think about what you would need to see in order to know, categorically, that the process was finished. So, if we continue with our Sales Process example we may expect this to only finish once an order has been placed. In which case the final output would be “Order Placed”, or “Signed Contract”. Just like the start point, there may well be multiple end points. Don’t worry about this. We know that not all leads will convert into sales so an alternative end point might be “No Sale” or “Sale Abandoned”. 

          These could be important outputs to know if in the future you want to investigate how you handle these leads. It will help you to understand how to map the process as well

          Most importantly, don’t overthink it. It’s better to put something that looks roughly correct to start with you can always change it as you map out more of the process.

          Step 2 – What happens? The key steps in your process map

          Now it’s time to start mapping out the main steps of the process. The key activities, or tasks, that make up the process. These steps describe the work that actually happens whether it’s done by a human or a machine.

          Pro tip – Always describe the steps of a process using Verb + Noun. They are activities so they should be described as actions, you are doing something to something. Some simple examples include:

          • Create lead
          • Register opportunity
          • Raise invoice
          • Submit purchase request

          These all start with a verb. Following this simple rule makes it much easier for anyone to read and understand the process afterward.

          Then as you map out a new process call out all the activities you can think of and add them as boxes. Often people use sticky notes if doing this on a whiteboard. If you are using Skore these are called What Boxes because they describe what happens.

          When working in a group, throw up all the activities people can think of and sort them into the correct order.

          You may end up with lots and lots of boxes on the page and that’s OK. Just go with it. You will quickly find that some steps are details which sit underneath others. Here you have a choice.; Either put all the detailed boxes into the process and create something that is very large and potentially difficult to read. Or you may group detailed steps together and create separate processes for them. In Skore you can create sub-processes easily that link to your high level process. 

          Want to learn more about process mapping styles and approaches? Read our guide here.

          Step 3 – Why? / So That? The reason for doing the work

          This may be one of the harder steps to master but is also the most valuable.

          The purpose here is to think about the value that each step brings to the overall process. Every activity should deliver something,  either physical, data, or a change of state. 

          This step helps you challenge thinking such as “we’ve always done it that way”. It helps people consider steps and suggest improvements.  For example if these outputs form the handover from one person to another it helps everyone agree what that handover looks like.

          Start working through each activity from the previous step and ask one or more of the following questions:

          • Why do we do this activity?
          • What do we have at the end of it?
          • How do we know when it’s finished?
          • What could we measure to ensure it has been completed?
          • What do we need to start the next activity?

          The output of each activity should become the input to the next. Once you have been through all the activities and added all the outputs the order of the steps will become even clearer. You may need to rearrange them to make sure.

          Skore Example Why and What box
          Image taken from the Skore platform

          Pro tip. Try to avoid using the past tense of the activity as your output. This is simply repeating the activity and adds little value to the diagram. If you really cannot think of a good output you can leave it blank, it’s telling you something about the step and might need more work to understand why there is no clear output. A really important part of understanding how to map a process is being clear about each step, input and output.

          Sign Up for Free Mapping Resources

          Step 4 – Who does it? The person that makes sure it happens

          Now you should have a clear process with all the steps and outputs defined and in the correct order. The next step is to define who, or what, is doing each activity.

          It’s recommended that you use roles or job titles to describe who does each step rather than individual’s names. This is because personnel may change or you may have multiple people working in the same role.

          By this stage you will probably notice that you are repeating or iterating through the process. This is, in fact, deliberate. Every time you do this you’ll realise that someone will probably notice something missing or inaccurate. This part of process mapping means that your process becomes clearer and more accurate over time. 

          Step 5 – What else? Any additional information you need to capture.

          Finally you get to this stage and it seems like the end is in sight. It is, but before you finish remember why you started this in the first place. It is vital to understand what the issues are and the opportunities to improve it. What you must make sure you do is capture these and you’ve probably been discussing them all the way through. 

          The trick here is to make a note of this information and make clear which part of the process it relates to. The simplest way is to annotate the process. You need to know how you will record this, it can quickly get messy and difficult to read. In Skore you can attach all these notes against the process in a clear and simple format. This allows you to capture information and report on them easily. 

          Notes made against a Skore What Box
          Image taken from a Skore Process Map

          You also may want to reference other related information such as tools, documents, policies, templates and anything that’s relevant. Again annotate the process in your agreed format or use Skore to capture the relationship.

          At last your process is complete. Remember however, that a process is a living and breathing thing and should be kept up to date as you make changes and improvements. The better documented the process the easier it will be to share with colleagues and get their feedback, thoughts and ideas.

          How to map processes- which process do I start with?

          So now you know how to map a process the question is which process do you start with? If you’re a growing business looking to build discipline around your processes so that you can scale effectively we recommend looking at our free Business on a Page template. This one page exercise helps you identify key processes and discuss which ones to start with. Once downloaded you can get going with your new found mapping skills.

          And Finally

          Remember – whatever anyone may tell you – you only need a pen and piece of paper to map out a simple process. You don’t need to be an expert in BPMN or a master of a drawing software tool. Anyone can learn how to map a process easily. Take back control and learn to how to map a process in your organisation, it’s a vital skill you won’t regret learning.

          Skore is the Process Mapping and Improvement Software designed to be used and understood by everyone in any organisation.

          Sign up for Free Mapping Resources

          Responsive Menu
          Add more content here...
          Responsive Menu
          Add more content here...
          Responsive Menu
          Add more content here...
          Responsive Menu
          Add more content here...
          Responsive Menu
          Add more content here...
          Responsive Menu
          Add more content here...
          Responsive Menu
          Add more content here...
          Responsive Menu
          Add more content here...
          Responsive Menu
          Add more content here...
          Responsive Menu
          Add more content here...
          Responsive Menu
          Add more content here...
          Responsive Menu
          Add more content here...
          Responsive Menu
          Add more content here...
          Responsive Menu
          Add more content here...
          Responsive Menu
          Add more content here...
          Responsive Menu
          Add more content here...
          Responsive Menu
          Add more content here...
          Responsive Menu
          Add more content here...
          Responsive Menu
          Add more content here...
          Responsive Menu
          Add more content here...
          Responsive Menu
          Add more content here...
          Responsive Menu
          Add more content here...
          Responsive Menu
          Add more content here...
          Responsive Menu
          Add more content here...
          Responsive Menu
          Add more content here...
          Responsive Menu
          Add more content here...
          Responsive Menu
          Add more content here...
          Responsive Menu
          Add more content here...
          Responsive Menu
          Add more content here...
          Responsive Menu
          Add more content here...
          Responsive Menu
          Add more content here...
          Responsive Menu
          Add more content here...
          Responsive Menu
          Add more content here...
          Responsive Menu
          Add more content here...
          Responsive Menu
          Add more content here...
          Responsive Menu
          Add more content here...
          Responsive Menu
          Add more content here...
          Responsive Menu
          Add more content here...
          Responsive Menu
          Add more content here...
          Responsive Menu
          Add more content here...
          Responsive Menu
          Add more content here...
          Responsive Menu
          Add more content here...
          Responsive Menu
          Add more content here...
          Responsive Menu
          Add more content here...
          Responsive Menu
          Add more content here...
          Responsive Menu
          Add more content here...
          Responsive Menu
          Add more content here...
          Responsive Menu
          Add more content here...
          Responsive Menu
          Add more content here...
          Responsive Menu
          Add more content here...
          Responsive Menu
          Add more content here...
          Responsive Menu
          Add more content here...
          Responsive Menu
          Add more content here...
          Responsive Menu
          Add more content here...
          Responsive Menu
          Add more content here...
          Responsive Menu
          Add more content here...
          Responsive Menu
          Add more content here...
          Responsive Menu
          Add more content here...
          Responsive Menu
          Add more content here...
          Responsive Menu
          Add more content here...
          Responsive Menu
          Add more content here...
          Responsive Menu
          Add more content here...
          Responsive Menu
          Add more content here...
          Responsive Menu
          Add more content here...
          Responsive Menu
          Add more content here...
          Responsive Menu
          Add more content here...
          Responsive Menu
          Add more content here...
          Responsive Menu
          Add more content here...
          Responsive Menu
          Add more content here...
          Responsive Menu
          Add more content here...
          Responsive Menu
          Add more content here...
          Responsive Menu
          Add more content here...
          Responsive Menu
          Add more content here...
          Responsive Menu
          Add more content here...
          Responsive Menu
          Add more content here...
          Responsive Menu
          Add more content here...
          Responsive Menu
          Add more content here...
          Responsive Menu
          Add more content here...
          Responsive Menu
          Add more content here...
          Responsive Menu
          Add more content here...
          Responsive Menu
          Add more content here...
          Responsive Menu
          Add more content here...
          Responsive Menu
          Add more content here...
          Responsive Menu
          Add more content here...
          Responsive Menu
          Add more content here...
          Responsive Menu
          Add more content here...
          Responsive Menu
          Add more content here...
          Responsive Menu
          Add more content here...
          Responsive Menu
          Add more content here...
          Responsive Menu
          Add more content here...
          Responsive Menu
          Add more content here...
          Responsive Menu
          Add more content here...
          Responsive Menu
          Add more content here...
          Responsive Menu
          Add more content here...
          Responsive Menu
          Add more content here...
          Responsive Menu
          Add more content here...
          Responsive Menu
          Add more content here...
          Responsive Menu
          Add more content here...
          Responsive Menu
          Add more content here...
          Responsive Menu
          Add more content here...
          Responsive Menu
          Add more content here...
          Responsive Menu
          Add more content here...
          Responsive Menu
          Add more content here...
          Responsive Menu
          Add more content here...
          Responsive Menu
          Add more content here...
          Responsive Menu
          Add more content here...
          Responsive Menu
          Add more content here...
          Responsive Menu
          Add more content here...
          Responsive Menu
          Add more content here...
          Responsive Menu
          Add more content here...
          Responsive Menu
          Add more content here...
          Responsive Menu
          Add more content here...
          Responsive Menu
          Add more content here...
          Responsive Menu
          Add more content here...
          Responsive Menu
          Add more content here...
          Responsive Menu
          Add more content here...
          Responsive Menu
          Add more content here...
          Responsive Menu
          Add more content here...
          Responsive Menu
          Add more content here...
          Responsive Menu
          Add more content here...
          Responsive Menu
          Add more content here...
          Responsive Menu
          Add more content here...
          Responsive Menu
          Add more content here...
          Responsive Menu
          Add more content here...
          Responsive Menu
          Add more content here...
          Responsive Menu
          Add more content here...
          Responsive Menu
          Add more content here...
          Responsive Menu
          Add more content here...
          Responsive Menu
          Add more content here...
          Responsive Menu
          Add more content here...
          Responsive Menu
          Add more content here...
          Responsive Menu
          Add more content here...
          Responsive Menu
          Add more content here...
          Responsive Menu
          Add more content here...
          Responsive Menu
          Add more content here...
          Responsive Menu
          Add more content here...
          Responsive Menu
          Add more content here...
          Responsive Menu
          Add more content here...
          Responsive Menu
          Add more content here...
          Responsive Menu
          Add more content here...
          Responsive Menu
          Add more content here...
          Responsive Menu
          Add more content here...
          Responsive Menu
          Add more content here...
          Responsive Menu
          Add more content here...
          Responsive Menu
          Add more content here...
          Responsive Menu
          Add more content here...
          Responsive Menu
          Add more content here...
          Responsive Menu
          Add more content here...
          Responsive Menu
          Add more content here...
          Responsive Menu
          Add more content here...
          Responsive Menu
          Add more content here...
          Responsive Menu
          Add more content here...
          Responsive Menu
          Add more content here...
          Responsive Menu
          Add more content here...
          Responsive Menu
          Add more content here...
          Responsive Menu
          Add more content here...
          Responsive Menu
          Add more content here...
          Responsive Menu
          Add more content here...
          Responsive Menu
          Add more content here...
          Responsive Menu
          Add more content here...
          Responsive Menu
          Add more content here...
          Responsive Menu
          Add more content here...
          Responsive Menu
          Add more content here...
          Responsive Menu
          Add more content here...
          Responsive Menu
          Add more content here...
          Responsive Menu
          Add more content here...
          Responsive Menu
          Add more content here...
          Responsive Menu
          Add more content here...
          Responsive Menu
          Add more content here...
          Responsive Menu
          Add more content here...
          Responsive Menu
          Add more content here...
          Responsive Menu
          Add more content here...
          Responsive Menu
          Add more content here...
          Responsive Menu
          Add more content here...
          Responsive Menu
          Add more content here...
          Responsive Menu
          Add more content here...
          Responsive Menu
          Add more content here...
          Responsive Menu
          Add more content here...
          Responsive Menu
          Add more content here...
          Responsive Menu
          Add more content here...
          Responsive Menu
          Add more content here...
          Responsive Menu
          Add more content here...
          Responsive Menu
          Add more content here...
          Responsive Menu
          Add more content here...
          Responsive Menu
          Add more content here...
          Responsive Menu
          Add more content here...
          Responsive Menu
          Add more content here...
          Responsive Menu
          Add more content here...
          Responsive Menu
          Add more content here...
          Responsive Menu
          Add more content here...
          Responsive Menu
          Add more content here...
          Responsive Menu
          Add more content here...
          Responsive Menu
          Add more content here...
          Responsive Menu
          Add more content here...
          Responsive Menu
          Add more content here...
          Responsive Menu
          Add more content here...
          Responsive Menu
          Add more content here...
          Responsive Menu
          Add more content here...
          Responsive Menu
          Add more content here...
          Responsive Menu
          Add more content here...
          Responsive Menu
          Add more content here...
          Responsive Menu
          Add more content here...
          Responsive Menu
          Add more content here...
          Responsive Menu
          Add more content here...
          Responsive Menu
          Add more content here...
          Responsive Menu
          Add more content here...
          Responsive Menu
          Add more content here...
          Responsive Menu
          Add more content here...
          Responsive Menu
          Add more content here...
          Responsive Menu
          Add more content here...
          Responsive Menu
          Add more content here...
          Responsive Menu
          Add more content here...
          Responsive Menu
          Add more content here...
          Responsive Menu
          Add more content here...
          Responsive Menu
          Add more content here...
          Responsive Menu
          Add more content here...
          Responsive Menu
          Add more content here...
          Responsive Menu
          Add more content here...
          Responsive Menu
          Add more content here...
          Responsive Menu
          Add more content here...
          Responsive Menu
          Add more content here...
          Responsive Menu
          Add more content here...
          Responsive Menu
          Add more content here...
          Responsive Menu
          Add more content here...
          Responsive Menu
          Add more content here...
          Responsive Menu
          Add more content here...
          Responsive Menu
          Add more content here...
          Responsive Menu
          Add more content here...
          Responsive Menu
          Add more content here...
          Responsive Menu
          Add more content here...
          Responsive Menu
          Add more content here...
          Responsive Menu
          Add more content here...
          Responsive Menu
          Add more content here...
          Responsive Menu
          Add more content here...
          Responsive Menu
          Add more content here...
          Responsive Menu
          Add more content here...
          Responsive Menu
          Add more content here...
          Responsive Menu
          Add more content here...
          Responsive Menu
          Add more content here...
          Responsive Menu
          Add more content here...
          Responsive Menu
          Add more content here...
          Responsive Menu
          Add more content here...
          Responsive Menu
          Add more content here...